
What kind of housewarming party is appropriate when you move
into a church? The church's groundbreaking began in 1909 and, according to a 2012
article on church conversions in TheSeattle Times, it needed three services to celebrate the completion of its
sanctuary on June 7, 1914. The Seattle Times reported, "Following the
unostentatious custom of the Scientists, there will be no joy-making."
There would, however, be music from the church's new organ, but it would not,
the Times assured, be "blaring music" nor would there be any
"speechmaking."
We closed on our townhome in early August of 2012. God bless
our moving company because they’d
stuck with me as the closing date shifted three times. One of the movers paused
in our main living room and remarked to me how odd it felt to be back in the
very church he had attended as a child. His parents had been members of First
Church, Christ Scientist. He mentioned he liked it better as a home than a
church. I’m sure there’s a story behind that.
Our home’s christening needed to be much more lively than
the original 1914 snoozer, which was said to have featured two readings, a Biblical
passage, along with a scientific passage written by the church’s founder, Mary
Baker Eddy. So then, what better to honor the era of enlightenment, from the 1900s to
the 1920s, than a Speakeasy Housewarming!

A red carpet lined the main steps up to the double doors of
The Sanctuary. We hired a 1920s-style jazz band and a couple of dance
instructors to teach our guests the Lindy Hop and Charleston. Roaming
characters (Amelia Earhart and a gangster with his moll) mingled with our
costumed friends. We played silent movies in the media room on a loop and set
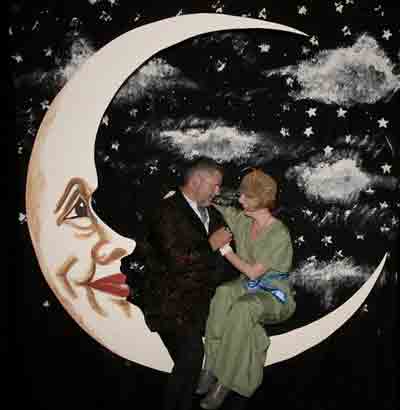
up a 1920s Paper Moon photo backdrop.
I’m including the steps to build the same backdrop below.
Early in my career I worked in the promotions department of a South Florida
television station. Back when career path meant less to me than having fun on
the job, I was lucky enough to occasionally build fake movie sets on a dime (Styrofoam headstones
for Horror Week and a little city for Godzilla Theater).
On a whim, one evening when my husband and I were awake at
3am from jetlag, we decided we should build the 1920s Paper Moon photo backdrop. For an IT VP,
he is a surprisingly gifted carpenter! Here are the steps and some photos:
1.
Measure your space. (We used the entrance hall
downstairs and draped the room in black cloth)
2.
Create the art. Find a paper moon sketch on the
Internet (line art works best). Use any drawing program to add the outline of
the face. Google for some 1920 postcards to use as a reference art.
3.
Copy line art outline to plywood. We used a
projector, but you might also sketch a grid a recreate the design on the larger
board. We lined up two plywood boards that were about 6’ x 10’ and traced the
moon outline onto them- we’d connect them later. Working with the moon image
projected on its side, the majority of the moon shape was cut out, with the
tips cut from the second sheet of plywood. We then attached the ends and braced
the moon together on the reverse side.

4.
Inset any bracing screws and putty over them.

5.
Paint the moon a pale yellow.

6.
Paint the darker brown shadows for the face,
eyes nose and mouth (it may help
to know someone artistic for this part).

7.
Paint the details of the face. Add highlights to
lips and eyes

8.
Purchase a large black photo backdrop—ours was 10’ x 20’ for the wall and a second 6’x10’ for the
bench

9.
Add stars and clouds using an ivory paint and
sponges. I used one shaped like a star and added the clouds by blotting the
sponge, heavily loaded with paint.

10. Build
the bench. We used some 2 x 4s to build a seat. Spray paint the bench black.
11. Drape
the smaller black backdrop (unpainted) over the bench and attach it (with
screws) to the moon. You’ll need to add some cross braces to the back to hold
the moon upright. Putty over any visible screws and touch up the front side of
the moon.


12. Set up a camera with a self-timer and let the fun begin! Post the photos online so your guests can download after the party.
